New Stove!

January 3, 2010

Finally, after weeks of saving we purchased a new stove for the kitchen. A new stove was not a priority since there is nothing wrong with our old one. It's just outdated and did not match the rest of the kitchen. Home Depot had a sale, so we ordered it right a way. It's coming on Wednesday!

GE 30" Freestanding Gas Range here.


Of course I was coveting this one forever but there's just no pay off on a stove. It's just a sunk cost. It's stainless steel and cast iron, so it costs more and has more features, but it also uses more BTUs. In other words, it's going to cost you more to cook instant mac-n-cheese on this versus one of the less costly stoves. It also boils water faster. However, a convection oven would really be useful since I do love to cook and bake.


Maybe in our next home :)

Mending the Dining Room continued...

January 2, 2010


Early this morning, Keith used the scrap wood paneling from the bar to fill in the floor. We found some extra linoleum in the attic that the previous owner left behind for us. I'm really not so concerned with patching it up. I plan on throwing a rug over it anyhow.


He decided it was better to replace the entire chair rail instead of piecing it together. He wants to do the same to the bottom. We had a tiny bit more sanding and touching up to do.


Back to work!!! Basil was really crackin' the whip on us. We couldn't even stop for a drink of water.

Jute Roman Blinds

I'm addicted to Overstock these days. At $1 shipping, you can't beat that! Our dining room receives a lot of natural light and it's a shame to throw curtains over the windows because it reduces the natural light and warmth in the house by a great deal.

Nevada Timberwolf Roman Shades 30x72


Also, we have beautiful molding which we should show off. These inexpensive roman blinds will provide us with natural light in the day, privacy, and elegance over heavy drapes.

Bar Demolition continued...

January 1, 2010

Early this morning, we continued to disassemble the bar. There were 2x4's bolted to floor and wall with anchors! Then, another 2x4 bolted to the first 2x4. Then more 4" long screws and nails to another 2x4 which made up the frame of the bar!


You can see that the bar left a space in the floor so now we're going to have to fill it in with wood panel. You can also see the remnants of the former dining room. Baby blue and wall paper!


Keith spackled all the bolt and nail holes while I cleaned and prepared to repaint. Basil continued to manage us.


This is the part that I hate about doing home projects. The rest of your house or room is a mess! While we waited for the spackle to dry, we removed all the old nails and discarded any wood we couldn't salvage for future projects.


When it was dry, we sanded it with sandpaper and a damp cloth to smooth the edges to be flush.


I continued to clean and painted the area. I repainted all the white so it would match.

Tomorrow, we're going to fill in the floor and change out the old outlets because they look outdated and are black. Then I'll have to clean and polish all our furniture again and set the room back up. I might go shopping for an area rug.

Back Door

Our two entry doors are pretty hideous. They are steel doors with one window in them. The back entry door leading to the deck was once a window. Although I appreciate the door, it's smack in the middle of the wall and it's all you see from the living room. The previous owners left us an album of their before and after pictures which is impressive! They gutted the house and even installed all the molding around every door way from scratch.

Anyhoo, if we're going to have a more formal, elegant dining room I would really like to change the back door out. This is what we were thinking. There's no room for french patio doors, but this will work as a single door. It will blend into the setting a little better and provide us with a beautiful view of our yard.


From Lowe's:

I love online shopping!

I order this chandelier for our dining room from Overstock. I went with something mainstream since we will eventually sell this house. We will be replacing the ceiling fan with this. We also have to remove the fluorescent gym lighting in our dining room as well.


We are officially OLD!

HAPPY NEW YEAR 2010!

The hubs is very sensitive about this subject, but he knew that the day would come where he would have to let go of his bachelorhood, marry the love of his life (eh hem, ME) and .... demolish his beloved bar!

This is how we spent part of our new year's eve.


Keith saying goodbye one last time. (tear) On the other hand, I was jumping for joy! Look at all the circulation space we will have now. Dinner parties are swirling in my head.


It took us both 2 hours to get it to this point. Because the previous owner built it into the house, there were so many different types of nails, screws and BOLTS! The bar is apparently bolted to the floor and wall which we will work on today. After an exhausting demo, we went to a NYE party for some much needed drinks.


Basil was managing the project for us.

We hope to finish the demo today and I will start mending the wall and molding. I ordered a chandelier for the dining room which will be arriving in a few days. It will be a total overhaul.

2010 DIY Goals

December 5, 2009

We've been taking a break from the house in the summer when I'm in our garden. Now, that it's winter again we will be picking up where we left off. Here are some things we plan on doing immediately this winter:
  • Replace the kitchen countertop.
  • Install the 1/2 bathroom on the first floor - includes putting in the plumbing from scratch and tiling the floor.
  • Tiling the kitchen back splash. This will be my first attempt at glass tile.
  • Demo the built-in bar in the dining room & repair all the molding that will be missing.
  • Installing wood floors in the dining room.
  • Replacing the lights in the dining room.
If we survive, we'll be finishing the basement next fall. We need a little more room for a home office, game room, spare bedroom and storage. That's all going to go into the basement.

What are some of your goals? Do you have things on last year's list that have been carried over?

Dinner

July 30, 2009

Using veggies from the garden:

Spinach Fettuccine, Yellow Squash and Pesto


Corn, Grilled Pork Loin, and Salad made of English Cucumber, Green Apples, and Feta.

Hello Kitties give a tour

July 27, 2009

Helro I'm Kitty. No, I'm Kitty. And we're going to give you a tour of the new guest room.


First, let's revisit what the room use to look like before Keith and Anita moved in!

Before: 2006 - Previous owner - Traditional, forest green molding and white walls. Very un-kitty friendly. But that basket looks like a kitty place to sleep.


After we moved in! Yippee! Bright teal and deep, rich cherry brown. Wow! But a little bright on these kitties' eyes, don't cha think? And a little too cramped for the 4 of us.


Now: Light and airy. Keith and Anita moved into the other bedroom and gave us this bedroom! Hooray! And look! There we are!


And now back to Anita to finish the tour while we enjoy our new room.


Inspired by Pottery Barn, I sewed the paisley patterned duvet cover. The sheets are super soft too. 360 thread count by Sutton Park from Ross. They look baby blue, but they are actually teal which lends a contemporary look.


Next to the bed is a wicker shelf taken from the porch furniture. Here it's being used as a night stand/book shelf. I love the way it looks because it adds charm to the room.


The opposite side of the room.


Lamp-yard sale find $7, 1940 French style mahogany table-Craig's List, Wicker waste basket-Ross $4, New light switch plate-$6 Lowe's.


Bird & Cherry Blossom hot plate - $1 at Goodwill. It's pretty and acts as a coaster.


I was going for a contemporary look in this room, but it naturally evolved to a more traditional style. It looks so peaceful and soothing that I just want to put my head down and stay here forever.


We hope you enjoyed the tour!

Our RED Door

July 26, 2009


After giving our rhododendron a new home yesterday, I thought the front of the house could use some sprucing up. I love the look of bright front doors or shudders, so I got the okay from the hubs to paint the door red! I only wished we had black shudders.

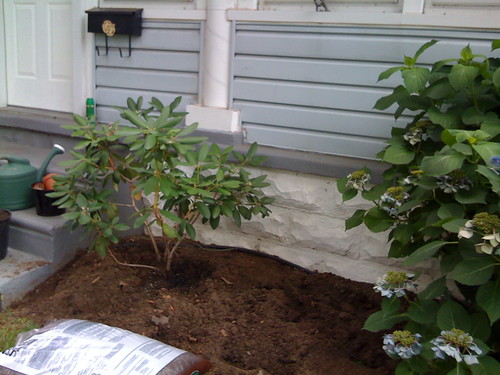
Curb Appeal - Rhododendron

The front yard was an area that I kept ignoring, but really needed some shaping up. Besides being busy with the veggie garden and back yard, the reason I was holding out is because I really wasn't sure what to do about the front. Did I want to build it up? Did I want to plant more? Should I get rid of the hydrangea? The front segment just looked unbalance and had different needs - blistering sun on the south side and cool shade on the front side.


Before: Our meager little shrubs last spring '08. From left to right is my peony, a rhododendron (center) and hydrangea (that came with the house) and a new weeping cherry blossom tree.


After: I moved the Rhododendron over to the left about 2 feet and turned it 90 degrees, so it would grow more attractively. Doesn't it look like a totally new plant!?

I asked my neighbors who told me that the Rho had been there at least 6 years and hasn't grown one bit! So I did some reading online about how to care for Rhos and read they needed a shot of fertilizer in the spring, moist soil, natural compost such as leaves, and in extremely poor cases some strategic pruning. This spring I did give it some flower food pellets and noticed the Rho grew at least a foot! I also pruned 2-3 branches back that were growing funny.


Before I moved it, I filled the hole with lots of leaves and tree bark that I gathered from the lawn. Carefully I moved the entire Rho with the root ball intact into the hole and back filled it with very rich humus from the nursery.


Always water thoroughly. I made a "well" around the base and slowly poured 2 buckets of water into the area. Then I mulched over it.

Guest Room Continued...

July 23, 2009

I touched up the edges yesterday and gave the walls a second coat of paint. It's really starting to come together now. I also painted the old Ikea dresser white. I still have to give it a second coat and change the knobs out. The dresser holds all my sewing and scrap booking stuff.


The room feels so much more spacious now. I wish we had arranged it this way sooner.


Now, I'm looking for bedding and an accent color.

Guest Room

July 20, 2009

I took the day off today to decompress after this long summer of weddings and birthday parties. It was just what we needed. I spent the day repainting the guest bedroom which was previously our bedroom. I had quite a few ideas including painting one wall red. I really wanted some pop in this room since it's also my office. Since this room will likely change again, I decided on this light color and add bold splashes using bedding and throw pillows instead.

The color is Vanilla Bean by Eddie Bauer in Satin. Its a creamy color with a yellow tint. They claim you don't need to prime but I totally had to prime. The blue was still showing through and made the wall look green.

I still have some touching up to do and the molding needs repainting. Since the room is a mix of furniture I'm painting some of it white for a cohesive look.

I moved the dresser to the other side of the room and put the bed here against this wall. I think I'd like to put up some wall shelves here and lean frames on it.

Today, I repainted all the trim and molding in white high gloss. We did a hasty job the first time around, so I wanted to make sure I did it right this time. Tomorrow I'll go over the edges again in Vanilla Bean and give the walls a second coat.

Project: Closet Expansion

I sketched up some plans of my closet expansion idea.

Existing Closets


New Plan for Closets - Knock out the walls and put up new walls which will be slimmer giving us a few more inches in width for bulkier clothing. Take up both old closet areas to make one large full size master closet with a set of bi-fold doors. Move the supply grille.


The closet depth is the width of this wall here. Behind this wall is where the closet magic will happen.


Current closet in the master bedroom


Hopefully this is what it's going to look like when we're done. We're going with the Craftmaster Bi-fold doors. This way we both have access to the closet at the same time (as opposed to sliding doors that overlap). The 60x84 doors make the most sense. We can get more height in to reach the shelves (which we'll install) to put our shoes or blankets. Also, it's the perfect width so that we can still open the bedroom door without covering the closet doors.


Another issue with these closets are the doors. In the spare bedroom (where I have to keep my clothes), I have to open the bedroom door in order to get to the closet door. Then the closet door is banging into furniture. The plan is to seal this opening up. Then make a boxed out closet to the right of this with double sliding doors to conserve space.


Office/Nursery/3rd Bedroom Closet - We would like to extend this one too.


If only I had all the time in the world.

Revisiting the To-Do list

July 19, 2009

We have pretty much completed all the major to-dos including all the things we added to the list throughout the year. Our priorities have shifted as well so we let a few things slide too.

What I'm most proud of is finishing the kitchen including tiling the floors, mulching the garden and setting the perennials in place for next year, and getting rid of a lot of clutter via yard sale! In addition, we even decorated the master bedroom, bathroom, and hallway upstairs and downstairs. I have also picked up a new trade - sewing!

Here's what is left over from last Fall:
  1. Doing the half bathroom - The estimate is $3K, so we're holding off. After the kitchen reno, we're not ready for the first floor of our house to get turned upside down again.
  2. Install gutter guards - I'm just dragging my feet. We've had so much rain too. I better do this before the leaves come down in the Fall.
  3. Replacing windows - The estimate to fix the springs in all 15 windows is $1700. To replace is $400 per window. We need at least 2-4 windows replaced at minimum.
Here's our new and updated To-Do list:
  1. Knock out our bedroom closets - Moving away from the superficial, let's talk about function. None of our bedroom closets are large enough and haven't been updated. Our plan is to knockout the wall that the closets (and 2 bedrooms) share. Turn the 2 old closets into 1 large closet for the master bedroom. Make a new closet that boxes out into the spare bedroom.
  • Update lighting in the dining room - Remove the gymnasium fluorescent light fixtures and replace them with recessed lights or just seal it up all together. Add a light attachment to the ceiling fan.
  • Update the Guest Bedroom - It's a mish mosh of furniture and colors currently. I just want to give the whole room an overhaul.
  • Extend the garden/landscape in the front of the yard.
That's it for now. I don't want to overwhelm myself with projects.

Sun Room

July 13, 2009

On the east coast, this is also known as an enclosed porch (foreign to you west coasters who have wonderful weather every day of the year - you suck!). This porch has evolved quite a few times. Originally, it was pink and I painted over the pink in white gloss. It was filled with hand me down furniture in navy and yellow.


After my painting extravaganza this weekend, I got rid of all the clutter and just re-used what we already had. The only thing that is missing now are some cushions for the love seat and rocker which I plan on sewing new covers for. I'm just looking for the fabric right now. On the other end of the porch (not shown) is where we keep our shoes and tools (since we lack a garage). I'm thinking about getting little cabinets to hold our stuff in which can also act as seating or a place to put plants on.

Uncle Paul's Seafood Sauce

July 12, 2009


Inspired by my husband's uncle's delicious seafood sauce on linguine that I had to come home and try making it myself. He didn't give me the recipe, but I came up with something based on what I tasted. I added some chopped tomatoes, fish and bay seasoning to kick it up a notch. I love Cioppino and that was what I was going for.

Here are my ingredients:
  • a full bunch of parsley (no stems)
  • 6 cloves of garlic
  • 1 onion - diced
  • olive oil
  • butter
  • white wine - Yellowtail
  • 2 filets of fresh catfish
  • seafood mix - mussels, clams, calamari, baby shrimp
  • 1/2 lb jumbo shrimp - cleaned and deveined
  • 1 can of whole tomatoes - coursely chopped
  • 1/2 jar of clam juice
  • Bay seasoning, salt, pepper
  • 1 box linguine
Cook the onions, garlic, tomatoes, etc and make your base sauce first. Add a little white wine and the seafood mix. Then add the fresh fish and shrimp. Serve over pasta with some grated cheese or lemon juice.

LinkedIn

Related Posts with Thumbnails