Wall Art

November 27, 2008

A few weeks ago, I put these photos up from our travels - me on the beach in Saba, me in a rain forest in front of a cool looking tree, us in Chichen-Itza, Mexico, and us in Paris. The sad thing is we don't have high res photos from our travels, so my picture choices were limited and not very artistic. Now, I'm looking for various antique elements to go along with the picture frames.


Sconce in the hallway. I bought this a long time ago and never put it up until now. It adds a really pretty touch to the space.


Things to do:
  • Frame photos from the garden.

Getting ready for Christmas

I know it's Thanksgiving, but let's face it. Christmas is the holiday we look forward to most. We took advantage of the warmer days to put up lights outside and clean up. We got these little lighted trees last year. At first, I thought they were cheesy, but now I like them. It's like a little path for dwarfs.


We bought a fake tree to put on our porch, so that it's visible from the outside. Our enclosed porch blocks the view of our real tree inside the house, so we decided to do up the outside instead. I'll put out some cookies and milk on the table.


I wrapped some faux presents in brown paper with various bows to put under that tree which was a lot of fun. I used various leftover ribbon and bows that I saved through the years (yes, I'm saver). The white yarn pom pom was from Mrs. Chickadee last year. I loved it so much that I couldn't bare to throw it out.


Inside the house, I'm slowly putting up garland. I really stink at this. I have no clue what I'm doing or if it looks good.

In other news, I touched up the ceiling paint in the now spare bedroom and office. When we moved in, we painted in a hurry and the poor results show. There were tons of paint blotches all along the corner where the ceiling and walls meet. I bought the same brand of ceiling paint and crossed my fingers that it would dry to match. I edged around both rooms and the results look much better now. That's one task that I can put to bed.

The "new" Guest Room

November 17, 2008

After yesterday's move, we went back to our old place to tidy up. I had big plans to redecorate this room by giving it a modern face-lift, but after putting things back and the exhaustion kicked in, I'm quite happy with the room. It has a "bed and breakfast" feel which is really calming.


I'm going to sew a bed cover and drapes, so the room isn't so mismatched. Surprisingly, the stain of the bed frame matches our bedroom furniture pretty well. There is so much more space in the room now for movement.

We've Moved!!!

November 16, 2008

...our bedroom.

Keith and I thought it would be really practical to send each other loves notes via paint. Here he is responding to my message on the same wall from 2 years ago.


So we moved from the medium sized bedroom into what was my office/guest bedroom, which is the largest bedroom in the house. Although this is the largest room, we used the medium bedroom as a master bedroom because of our bedroom furniture. This room was awkward in wall space and we wanted to keep the bedroom set together.


Finally, we decided enough was enough. Why are we not using the largest room in the house? Why are we living around our bedroom furniture? We split the bedroom set up: Bed and tall dresser in this room. Armoire and night stand in the other room. This way, it looks as though both rooms are fully furnished, but they really one set.


Before Pic: I went to Home Depot last night and randomly chose a color. It's "Light French Gray" by Behr. It's a blue toned gray color. At first, it looked a bit like Periwinkle which had me worried. After it dried, you could see the gray blue.


Retail is down, so I got this mirror for $7 (originally $26)


We brought the love seat up to create a little sitting nook in the bay area of the room.


Now, to clean the other room...

Block Party Banner

November 6, 2008

*I just noticed a post that was in my drafts folder that never got posted. Originally dated for Aug. 28th, 2008*

Our block is having (had) their annual block party and I volunteered to make a banner to hang above the street. At first, the idea started out as an old bed sheet and acrylic paint. Then, I was curious to see if I could sew it. We can use it over and over again each year.

I embellished it with a butterfly and flower.


The letters "E" and anything with a center like "R" or "A" were the more difficult letters to sew because I had to stop at every single corner which got annoying after a while.


The leaf and bird is my favorite part of this.


Once it was up above the street, it seemed so short, but it was actually quite long. Next year, I will have to sew a back to it, so you can see it from both sides.

To-Do-List update

November 5, 2008

I love seeing our to-do list shrink!!!

FALL ‘08

Things to Do Soon
  • Put up Christmas lights around outside of house.
  • Install gutter guards.
  • Buy new dryer

Living Room

  • Crown molding.
  • Tape South window.
WINTER '08-'09
Kitchen
  • Install cabinets on refrigerator side.
  • Install dishwasher.
  • Install cabinets on sink side.
  • Cut existing counter top.
  • Do floor tiles.
  • Give kitchen second coat of paint.

Water Closet

  • Spackle, sand and paint. (Working on spackle now.)
  • Staple molding
  • Toilet - Getting an estimate for installation soon.
  • Sink, Shower?
  • Do floor tiles
  • Paint and Install door (in attic)
  • Replace light and cover.
SPRING ‘09
Yard
  • Mulch heavily in weedy areas.
  • Lay pavers down under BBQ grill.

Repainting Along the Staircase

November 2, 2008

To match the living room, I finally repainted along the staircase. We painted it when we first moved into the house and did a rather hasty job. We really scuffed it up too when we moved the furniture in, so I have always meant to repaint it.


I had to remove the railing and switch covers again.


I had to give it almost 3 coats of paint to give it a clean finish.


Now, I'm selecting photos to hang on the walls. We want to hang photos from our travels, but it seems like "Keith and Anita" overkill.


I also touched up the bathroom molding.

Chalkboards

November 1, 2008

My first memory of a chalkboard was in Anne of Green Gables when "Anne with an E" breaks her chalkboard over Gilbert Blythe's head! I have always had a fondness for chalkboards and since we started the kitchen renovation, I have on the look out for a antique chalkboard or vintage frame that I can paint and turn into a chalkboard

My neighbor was selling a mirror that she took from an old medicine cabinet, so I started looking for chalkboard sheets to turn the mirror into a chalkboard. I like it because it has the original hardware on it which makes it interesting.

Peel and Stick Chalkboard from Olive Kids


Coincidently, I'm not the only one with this idea. Etsy seller Artebella sold this antique chalkboard with hooks and doorknob. It's so cool! We have a 5-panel door in the kitchen where I plan on hanging the chalkboard anyway, so maybe I should just stick the chalkboard sheet into the door?


I started seeing them all over the place. On Kitchen Designer, I'd see these neat chalkboards tucked into the back splash of kitchens, but where do *I* find one!?!

(image from Vakre Hjem)

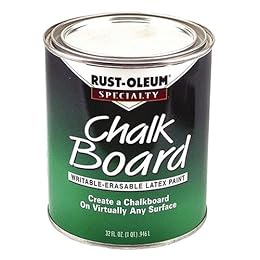
Then I read that Rustoleum sells chalkboard paint! I smell Project! I think this is so cool. You could paint a whole wall of a child's play room or kitchen wall.

$14.93 from Target


Here's an interesting article on How to Paint a Chalkboard.

I love this idea from Real Simple of painting an image that kids can draw on.


What do you think? A mural? A frame? A door?

Installing Window Casing

Part I: Window Trim

We finally installed the casing around the window today! Casing was on sale too, so we came in under budget. The left, right and top pieces are 2 1/2" wide and the bottom piece is 3 1/2" wide.


Materials:
  • Miter Saw (or table top saw)
  • Window/Door Casing - $19
  • Finishing nails
  • Spackle, caulk, primer, paint
The yellow box is a miter box. It has slots in it so you can saw a piece of molding or casing at a straight edge or at 45 degrees where the corners meet.

If you have a table top saw, it's even better because you can gauge the angle for yourself and get the corners to meet flush like when our friend Andy did our dining room. This is necessary in many cases since walls and frames aren't exactly straight or even, so you may never have a perfect 45 degree angle. This is almost always the case with installing crown molding because you may have all sorts of angles and/or an uneven ceiling.

Here's the first piece going up. Nail the casing down into the window frame.


The rest of it.


Hammer the nails a little deeper into the casing, also known as "dimpling". Then fill the dimple with spackle. Allow to dry, sand, prime, paint and then caulk the seams. I'll work on that tomorrow.


I also patched up the box around the exhaust duct for the range hood.

Cleaning the Gutters

One word - Nasty. I'm faking the smile here.


To clean your gutters: Securely put a ladder up to the gutter. Take all safety precautions. With gloves, grab all the leaves and put them in a plastic bag. When the bag is full, tie it up and toss it.

This is definitely my least favorite task. I wouldn't recommend you doing this if you don't have to. Hire a handyman and install some gutter guards. If you don't have gutter guards, the leaves will clog up your drain pipe and water will just sit in your gutters until you manually clean it out as I had to do today.


As you can see in the above picture, I was pretty high up there. It was a little disconcerting even for someone who is not afraid of heights. This task ranks up there with cleaning a toilet at a fraternity house after a super bowl party. It was wet, dirty and buggy. I should get Wife Of the Year award for this.

Happy Halloween

LinkedIn

Related Posts with Thumbnails