Nursery over the weekend

June 7, 2011

Last week I painted a pattern in the nursery. I got the idea from a Pottery Barn nursery, but more on that later. To finish it off, I asked Keith to install a piece of chair rail on that wall. Over the last two days I have been spackling the nail holes and touching up the paint.


I started painting the closet shelf and clothing rod. It took 3 coats of paint to get it to look solid. I also painted over the wall where I did a test trial of the wall stencils.


We took an interesting trip to ikea.


Where I picked up these curtains for the nursery. I like how the pattern mimics the wall stencil.


Progress photo

Kitchen Blinds III

December 27, 2010

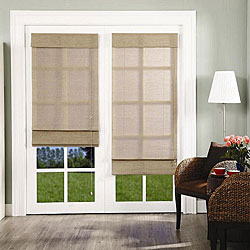
Yes, we're revisiting the kitchen window once again. The first two iterations just weren't working for me. I love the look of roman blinds, but the one I sewed was blocking the natural light. Here's the new one I ordered from Overstock.

Because of the trim on the inside of the window, we couldn't mount the brackets on the inside of each side as we usually do. Instead, the hubs mounted them on the outside face of the trim. At first, it looked awful. The blind is shorter than the window since it was meant to sit on the inside of the trim, so that's exactly what it looked like - a short blind hanging off from a big window.


Then I had an idea! I asked the hubs to hang the curtain rod back up slipping the rod between the valence and the shade.


So now the rod looks like an accessory to the blinds and the roman blinds don't look like they are floating anymore.


These are the same blinds I ordered for the dining room but in a different dimension.


My hands are itchin'

January 8, 2010

It's like Santa came down on his sleigh and Rudolph couldn't halt fast enough. We received the rug for the dining room and the roman blinds. I haven't opened up the rug yet but the blinds look pretty nice. The one thing we needed most that we haven't received yet is the chandelier. Since you oughta work from top to bottom, we have to install the chandelier and patch up the ceiling before we lay anything else new down below. The last thing we need is plaster vomit all over the new rug. That reminds me I should scotch guard the rug when we lay it out. Keith is going to work on getting the fluourescent lights down this weekend and then we will patch up the ceiling. In the mean time, it's killing me that I can't buy any decor stuff until we have all this other stuff done! As for the dining room floor, we're not doing anything with it yet. If we do replace it, we're going to replace the living room floor all together.

In addition, I saw this image and really liked the way the curtains are done here.

Jute Roman Blinds

January 2, 2010

I'm addicted to Overstock these days. At $1 shipping, you can't beat that! Our dining room receives a lot of natural light and it's a shame to throw curtains over the windows because it reduces the natural light and warmth in the house by a great deal.

Nevada Timberwolf Roman Shades 30x72


Also, we have beautiful molding which we should show off. These inexpensive roman blinds will provide us with natural light in the day, privacy, and elegance over heavy drapes.

Budget Bathroom Make-Over

February 1, 2009

For 2 weeks, my bathroom Bland wouldn't stop moaning about how jealous she was of Hip the hallway. Finally, I gave her a make-over, so she would shut her lid.

The Make-Over:
  • Sewed a new shower curtain.
  • Gave the molding and doors a new coat of white paint in high gloss.
  • Replaced the cabinets with new hardware.
  • Replaced blinds with matchstick roman blinds.
  • Hung some wall decor.


The break-down:
Everything, but the hardware was on sale. It took some time to shop for these things.
  • Hardware $2.57/piece - Lowe's.
  • Matchstick blind $17.99 - Walmart.
  • 3 set of mirrors $14.99 - JoAnn's.
  • Paint leftover from living room $23-27 - Home Depot.
  • Magnolia picture $1 - The Goodwill Store.
  • Fabric $6.38/yard - JoAnn's.


From this picture: The new knobs really give the old cabinets a face-lift. The matchstick blinds give privacy, yet allow a lot of light to get in. The glossy white molding is super shiny and easy to maintain.


This set of mirrors mimic the Celtic pattern that is in the fabric of the shower curtain.


Installing new hardware is easy and takes 2 seconds. Hold the screw from the inside of the cabinet and twist the knob on. While the hardware is off, give your cabinets a thorough cleaning with some non-toxic wood cleaner.

Sewing the shower curtain:


My make-shift pin cushion.


(right edge is top of curtain) The back of the curtain. I sewed 2 pieces of fabric together to give it the width I needed.


When I sewed the 2 pieces together, I was careful that the pattern met up in the same place, so that it looked continuous. I pinned it and sewed slowly.


To give the curtain a crisp corner, I folded the fabric back on an angle. This helps keep the curtain from flaring out when it's hung.


For the top where the curtain rod would go, I folded the fabric over by 4.5". I sewed a line 1" from the edge and then again 3" apart. The 1" is for a little ruffle. The 3" is for the rod. This allowed enough room for the rod to sit comfortable.

The finished curtain is 68"Lx90"W. I should have gone maybe 75"L, so that it could sweep the floor a little and conceal the bathrub, but I made the mistake of not factoring in the extra deep rod pocket space (4.5") when I bought the fabric. Also, 90"W was perfect! Store bought curtains are 70x72 which doesn't give enough "scrunch".

What isn't seen here is that I diligently took off all the hardware on the bathroom door and cleaned the old paint off them. It makes a world of difference in appearance in my opinion.

I have a couple of more things to do:
Sew a tiolet seat cover and mats.
Replace the TP holder with something nicer.
Add more hooks to the back of the door.
Eventually replace the medicine cabinet and put up crown molding.

Cabinets continued II...

December 31, 2008

Finally, the cabinets are up! The hubs spent every night getting them up. It took a great deal more time and effort than I thought it would. The cabinets still need knobs and molding.


Before:


Here are the instructions on how to install the cabinets! Can they be any bigger?!


We spent a lot of time with the prep - measuring, aligning and pre-drilling holes. For security, he had to drill pieces of wood onto the wall first. Then hang the cabinets on those pieces of wood and secure with more anchor bolts from the inside of the cabinet.


It took approximately 2 hours to hang one cabinet, but once you got the hang of it, it went by more quickly.


While he worked on that, I began sewing the kitchen drapes. I think it turned out pretty cute. The curtain rod is from Joann's. Everything was 50% off.


I might add ribbons or sew some tabs 1/6 of the way in. I also still need to sew another curtain half way down the window in something sheer or or maybe white eyelet lace.

Installing Window Casing

November 1, 2008

Part I: Window Trim

We finally installed the casing around the window today! Casing was on sale too, so we came in under budget. The left, right and top pieces are 2 1/2" wide and the bottom piece is 3 1/2" wide.


Materials:
  • Miter Saw (or table top saw)
  • Window/Door Casing - $19
  • Finishing nails
  • Spackle, caulk, primer, paint
The yellow box is a miter box. It has slots in it so you can saw a piece of molding or casing at a straight edge or at 45 degrees where the corners meet.

If you have a table top saw, it's even better because you can gauge the angle for yourself and get the corners to meet flush like when our friend Andy did our dining room. This is necessary in many cases since walls and frames aren't exactly straight or even, so you may never have a perfect 45 degree angle. This is almost always the case with installing crown molding because you may have all sorts of angles and/or an uneven ceiling.

Here's the first piece going up. Nail the casing down into the window frame.


The rest of it.


Hammer the nails a little deeper into the casing, also known as "dimpling". Then fill the dimple with spackle. Allow to dry, sand, prime, paint and then caulk the seams. I'll work on that tomorrow.


I also patched up the box around the exhaust duct for the range hood.

Door Casing

October 18, 2008

Today, Keith put the molding back around the doorways. When Keith removed the casing back in April, he did so very carefully and marked each one with masking tape and a sharpie. That way, when he went to put them on, he would know what goes where. They are made of solid wood, so we didn't want to waste them and replace them.


Before:


After: What a difference!


He was even able to salvage the original nails and reused them.


Now, all it needs is some spackle, paint and caulking to make it look like new!

While he worked on this, I did a few other things myself...

Little Black Dress

February 2, 2008

Drapes are to Windows as Dresses are to Women. For a year and half, our naked windows have been staring at me begging me to take them dress shopping I have wanted to, but I don't feel like I can do the windows until the tone of the living room as been set. I know...I feel incredibly guilty because there's a ton of infiltration and heat loss through those windows, which is only jacking up our heating costs, our dependence on oil and working against the environment.

For my birthday last week, we went to Jomar to find some inexpensive fabric for drapes. We didn't walk out of there with anything for drapes, but we did get 20 yards of fabric for sheers. Jomar was having a sale so it was just $1/yard. On average, it can be anywhere from $2-$5/yard for sheer material. Since we have so many windows, we needed at least 30 yards, so every penny counts.

Since we had no luck at Jomar, we hit up the JCPenney Outlet at the Franklin Mills Mall which always has home stuff at really affordable prices. For one panel, drapes can cost around $25-45. For the bedroom, we found these on clearance for $12.99 for 2 panels! We were thrilled! They are similar to my bridesmaids' dresses. It's a gray-blue with a yellow undertone. I think I am going to go back to the store to find yellow/gold sheers to go underneath them which will pick up the colors in our accent pillow.


It's great for the winter, but might be too "heavy" for the summer. In contrast, I had another idea to use sheer material with a dark brown flocked floral pattern on it. It's going to be harder to find material like that though. Since our bed is in front of a window, I wanted to camouflage it a bit by creating a crown and have the fabric drape down like a canopy.


I'm not sure what to do with these walls. I'd like to add sconces.


This wall is really large and I really don't know what to do with it. Sconces would be too small and frames might be awkward with how rectillinear the mirror is.


In that far corner, I'd like to put a tall green plant and a new lamp. I'd like to replace the ceiling fan with a nice chandelier too, but the ceiling fan is actually pretty handy in the summer. There's no need for us to turn on the AC when it's just the two of us in one room.

LinkedIn

Related Posts with Thumbnails