Half Bathroom Day 3: Tiling

February 10, 2010

Bill the Tiler was awesome!

He was all business and went straight to work. He was so fast too, which is a real rare quality!

9:11 AM

While he waited for Pat to bring the cement board, Bill had already started laying down the tile to check out the pattern and make the awkward cuts around the toilet and water line.


He was hardcore working in a hail and snow storm outside!


Basil was helping me too and was laying down drop cloths so they wouldn't dirty *his* floor.


Leveling. Before he laid down the cement board, he applied a layer of thin set (which we forgot to do when we tiled the kitchen). The thin set gives the cement board that support it needs so that it doesn't flex and cause your tile or grout to crack. Opps! He told us he'll need to level the bathroom floor up to the kitchen floor by applying extra thin set on top of the cb but before the tile. That would take longer to dry.

11:37 AM


12:18 PM

He finished the corners, threshold and was already all cleaned up!

I'm glad I pushed for the diagonal pattern. It looks awesome! He's going to come back tomorrow to grout.

Because of the snow storm and all, the plumber won't be back until next Wednesday to finish the bathroom.

The tiler is here and boy is he good!

It's only 9:18 in the morning and the tiler got here and went straight to work! That's what I like to see! He has some amazing tools too which I'll try to post about. It's a little sad that I'm more excited about his cutting tools than say jewelry or something else like that.

I'm staying out of his way, but I told him that occasionally I'm going to run in and snap photos like MI-8 for my blog.

He immediately cleaned up, took measurements, marked the floor, started laying the tile pattern down and made all the trickier cuts before getting started.

I'm so excited about this tile!

By the way, we did run into a snafu. We never went back to buy more floor tiles to match the kitchen and those tiles are now discontinued. So we found a similar match in texture and color, but the bathroom tile is a little more brown and 13x13 instead of 12x12. So I asked the tiler to do a diagonal pattern, so that we're not trying to match what isn't matching anyway.

I'll be back with pictures tonight, so check back!

Half Bathroom Day 2: Roughin it

February 9, 2010

Day two: The plumber calls this part "roughin it" which is cutting the pipes and tying in a a new one. It's called "roughin it" because he says it's a thing you learn through experience. It may not fit the way you want it to so you can't exactly prepare for it the unexpected.


On the left is the space to run the new water and drain pipes up to the sink. On the right is the poop shoot for the toilet.


Here is the existing sanitary from the upstairs bathroom.


From the previous picture, that sanitary comes down to here in the basement. Notice the new tie in around the middle section. Then it goes out through the wall and out to the main sewer out under the sidewalk. The blue and white flex are the hot and cold water lines.

Notice the white pvc pipe coming through the other wall. That comes from the toilet and will tie into the main.


In order to get access to it, he had to go around and under the steps of the deck here and from in the crawl space under the deck.

Next: Tomorrow he's going to finish up the piping and the tiler is coming to lay down the floor tiles.

Half Bathroom: Day 1 - Planning

The plumber came in, took some measurements, got a handle of what needs to be done and where everything is going to go. He cut a hole in the wall where the sink is going to go and a hole in the floor where the poopster is going to go.


Originally, I ordered a vessel sink, console, and extended faucet from Overstock. Because the sink console I ordered was on back order until the end of February, we went to Lowe's and picked something else out. We saw what they had in stock and I really liked a vanity cabinet, granite top, sink combo they had (not a vessel sink). I am not posting pictures until the end, so I can keep you all in suspense!

We paid for it ahead of time and Lowe's gives us an invoice number in which the plumber is going to use to go pick up the goods since we don't have a truck.

A tiler that the plumber knows is coming tomorrow to do the floor tiles in the bathroom while the plumber finishes up. The floor needs to be leveled, so Keith and I decided we just don't want to deal with it.

Today, the plumber is working on cutting and joining the piping to the new bathroom.

My ghettofabulous counter

February 7, 2010

Our stove is stand alone with no counters on either side because there isn't much room to begin with. I really felt like I needed something though; a place to put my spoons and a bowl or some spices while I cook. I have bugging the hubbs to build me something and look what he whipped up.


He's not finished yet but this is the basic concept. I googled photos and this is what they do around stoves anyway. You just need to add some more wood that matches the cabinetry. Keith used the extra baseboard/toekick leftover from the cabinets to build a frame that matched the cabinetry. Then he cut a piece of counter top that used to be in the backroom (some day half bathroom) for the top.


Voila! It's sturdy and now there is a place for my stuff!

Good News & Bad News

February 3, 2010

Good News - Our sink arrived today! I'm getting excited and nervous about the bathroom installation.


Bad News - The sink console is on back order until the end of this month. I'm so annoyed. That means the bathroom will literally be half complete until we get the console. It's just as well! We still need to tile the floor and fix the door opening anyway.

Welcome to our new Dining Room!

February 1, 2010

(click to enlarge. Blogger isn't showing the full photo)


I will follow up with some BEFORE and after side-by-side photos and resource list. I was just excited that I had to show you all these photos for now.

Baby Afghan

January 31, 2010

I can finally reveal what I have been working on for 3 months!


My best friend of 17 years is having her first baby! There wasn't a gift on her registry that could show her how much she meant to me. I had to make her and her baby something. Something that required weaving as we are woven to one another. So I asked my MIL to teach me how to crochet. She taught me some basics and within 30 minutes I had it down. Using a baby afghan pattern, just follow the row by row steps. Anything that I questioned, I just googled and there were tutorials with pictures.


It took me a long time to finish a row at first. As I progressed, I got exponentially faster. I finished around Christmas time and had to keep it a secret until recently.


Basil even liked it. He was jealous that I was working on this and not spending time with him. The yarn and afghan were taking up precious real estate on my lap.


Me and the momma to be.

Happy Things


Cookbooks and art
(Ribba frame from Ikea)

The Honey Do List

Blog pal Nanette and I were talking about how we can get our husbands to be more productive around the house. I thought I would share since you ladies probably struggle with the same things all the time.


  1. Befriend your husband to your girlfriend's husband on xBox Live. Then she can help you keep tabs on your husband while you're running the domestic errands.
  2. Make a REALLY LONG TO DO LIST when you go away for a Girl's weekend or out of the house. If even just a couple or half the stuff gets done, it's still something and less you have to do.
  3. Make him clean the bathroom after he has friends over. He'll think twice next time about having a bunch of men over drinking beer and eating hot wings with blue cheese. Bleh!
  4. Tell him if you trip over one more piece of his laundry or video game or computer gadget, you're going to throw it out. Even if it's brand new!
  5. If he doesn't help you with the kids, tell him you're going to start telling the kids that he's not their father and their real daddy is going to show up one day who is richer, take you to Disney and would have let Mom be a SAHM.
  6. If all the above fail, withdraw sex, clean clothes, clean towels, warm meals, a stocked fridge, disconnect WiFi and sleep in the clean guest bedroom and let the master bedroom go to hell.
What works for you? Or are you one of those women we hate who have the incredibly helpful husbands around the house?

Project Half Bathroom: To-Do List

January 30, 2010

We just received confirmation from the plumber that he will be here to start on the bathroom 2 weeks from now! I am totally stoked! I wish he could come sooner because it's cutting it close to our get together that we're hosting with the Bees. Pat the plumber seems to feel confident that he can get it done in 3 days.

3 days? Excuse me I don't think I heard you right.

Imagine my elation when we've been living with a ceiling less kitchen for a year and months of unfinished home projects. He's pretty much a contractor in addition to being a plumber, so he said he could tile the rest of our floor and put the door in as well (at an additional cost of course). That's fine with me if it means getting it all done!


My bathroom inspiration from Better Home & Garden. I ripped this out of their magazine and have it taped to my kitchen/bathroom wall for months now. My MIL used bead board in her bathroom and I really like it. I think it's great for us because of the crappy spackle job we did with that room. I love the sink console as well and the wide vessel sink. I've used them before and I like it way better than the round vessel sinks. What really drew me to this bathroom was the mosaic tile. I get a lot of free tile samples at work and I thought this could be something I can do in this bathroom.

This is what I do before a project. I make a to-do list that includes more than what is involved with the room itself. Things that aren't always obvious (to men especially). Then I put them in chronological order.
  1. Measure room. Take notes of dimensions in a notebook. Take the dimensions with you when you shop.
  2. Buy sink console, cabinetry and toilet. You need these 2-3 things to lay out your room. That's why you take notes of the room dimensions.
  3. Clean out the room. It's our pantry currently so we need to remove everything and thoroughly clean any particles and dust.
  4. Either mark or temporarily set the cabinet in the room where you plan on locating it.
Here's the part that I get very worked up about - the prep.
  1. Protect your floors and surfaces. Because our soon to be bath is in the back of the house, dirty shoes are going to be walking through the entire length of the house for days.
  2. I start by throwing an old runner rug down from the front entrance through the living room to "protect" our carpet.
  3. Hang and tape plastic up in doorways to the dining room. I just cleaned it and I don't want more dust getting into that room.
  4. Because the room is attached to the kitchen, you can count on it getting pretty dusty. I drape the stove with an old table cloth (to avoid cleaning the burners and knobs).
  5. Stow everything away - wall art, decorative accents, utensil holders, etc. It's less you have to wipe dust off of later.
  6. Since our kitchen counters will act as a work area, line the counter tops with brown paper for protection from scratches.
Back to the bathroom:
  1. The plumber is going to come in and do his thing - run sanitary and water lines from the basement to the bathroom. Put in a flue for exhaust. Just leave me him alone to do his work. He will set the cabinet for a looksy to make sure the lines are going to the right place and that I like where the cabinet is at.
  2. Tile the floor.
  3. Spackle any holes or open seams (usually the access panel that you see behind your shower or bathtub).
  4. Do any painting or trim work NOW before the furniture goes in.
Hang the door:


(Nasty right? Yes, that's a sock you see.)
  1. We realized we had a little pickle on our hands. The previous owners took all the door trim off the opening so all that has to go back on before we can hang the door. We've never done that before and the walls are uneven. We're going to have to read up about it.
  2. Buy door trim, buy all the wood that goes inside the opening. Buy a threshold.
  3. Buy door hardware.
  4. Buy door. I found an old door in our attic that measure 27" wide. Our door way is 28.5" wide so I think this is the original door!
  5. Clean up old door, sand, paint.
  6. Install hardware.
  7. See if the door fits.
Back to Bathroom:
  1. Set all cabinetry and toilet into room.
  2. See if the toilet and faucet works.
  3. Install towel rack and toilet paper holder.
  4. Now hang the door.
  5. Clean up.
  6. Pay plumber.
  7. Add decorative accents.
  8. Have a new half bathroom poo poo party! Umm, okay. Maybe not.
Sherry and John over at Young House Love recently renovated their bathroom and this breakdown is great for reference.

Mother-in-law pleaseing Eggplant Lasagna


Keith's mom came over for dinner today. Eggplant and lasagna are some of her favorite foods so I combined the two and whipped this up!

Ingredients:
  • 1 medium italian eggplant sliced 1/2" thick
  • 1 box of no boil lasagna noodles
  • 1 can of crushed tomato (I use Tottorosa)
  • 6 oz of ricotta cheese with an egg mixed it
  • some shredded mozzerella
  • 1 small onion sliced thinly
  • olive oil, salt, pepper and garlic powder
  1. Place all your sliced eggplant and onion on a large baking tray with a generous drizzle of olive oil, salt and pepper. Bake at 350 for 45 minutes or until cooked and tender. A little brown is good but not black. If you do over bake, just leave out the black burned pieces.
  2. In a 9x7 lasagna pan, layer your ingredients together. This is how I did it: baking tray, crushed tomato, noodles, crushed tomato, ricotta cheese, eggplant/onion, shredded cheese, noodle and repeat.
  3. I made it ahead of time and put it in the fridge. The following day, just bake it in the oven at 350 for 1 hour. Serve with warm bread.
I don't add a lot of mozzarella because it can overpowering and I'm lactose intolerant anyhow. If there is too much, it doesn't seem to bake all melty the way I want it to either. I did not make tomato sauce. I just used the crushed tomato from the can as is because the eggplant had plenty of seasoning in it. Although it involved a little extra prep work, it was still an easy dish that you can put together and just throw in the oven and then get ready for your guests.

How do you like your eggplant?

Cheap Art

January 28, 2010

As we've learned, wall art isn't cheap. Also, store bought wall art ain't all that original either. I've been doing a lot of perusing online and I think I can sketch and make my own like this "Le Chien" (The dog) by Picasso. I do have some artistic talent, so I should be able to sketch some abstract thing, frame it and call it art!


Anyhoo, I ordered this 2009 calendar over a year ago from Burpee and the illustrations are beautiful. It seemed like a waste to throw it out. So I saved it and got some frames from Ikea to frame them as wall art for our kitchen.


Ikea's RAM frames were the perfect size and I didn't even need to add a matte around it.


I framed this watercolor that I bought in Paris 14 years ago! I just love it so much. This is going into the kitchen as well.

Next, I'm going to do a one line sketch of a french bull dog like Picasso's Le Chien.

Have you made your own wall art? What do you do?


Faux Paneling I: Planning

January 26, 2010

Faux paneling (or wainscoting) has been on my desired to-do list for 2 years now. We bought the trim and it's been sitting in our basement all this time, so I think it's time we do something about that.


Step 1: Take measurements and jot them down. I have a notebook designated with house related stuff. ie. Plumber's number, cost of appliance for future purchase, to-do list, ideas, reminders and little sketches. I went around the room with a tape measure and recorded all the dimensions on a rough sketch of the floor plan. Make a note of wall lengths, trim widths, baseboard height, door openings, and their relation to outlets and switches.


East Wall facing back yard.

Step 2: Based on the lengths of each wall, make a decision about how to break up the "boxes". I browsed magazines and images to see what the standard panel size was. Our chair rail is a tad higher (39") than a standard chair rail is supposed to be (because of the old wallpaper we had to hide), so the proportions of our boxes are different from what you may want in your house. I drafted mine in AutoCAD because it's easier for me, so I wouldn't have to do the math (and I'm just hardcore like that!)


North wall to kitchen

Step 3: Verify your measuremnents. Go back and check that your measurements were right in the first place. Take a second look at your room and make sure you didn't miss anything. Were you including the trim when you measured your wall? Is one door opening wider than the other but you assumed they were all the same width?

I think when doing a project like this, it's important to lay it out this way. It makes the rest of the project easier because then you don't have to think about it.

Alphabet Crib Bedding

January 25, 2010

Oh, my imaginary baby needs to have this!


I also love the gray walls. I would have never thought to do that.

from MiGiStyle.com

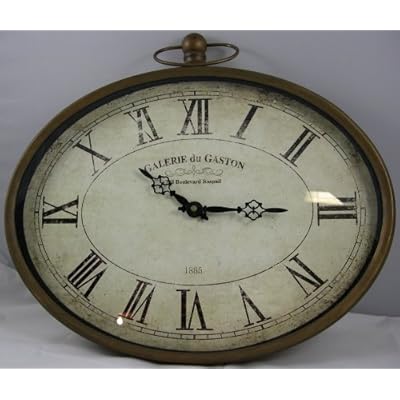
Vintage Style Oval Clock

January 24, 2010

This is a neat looking clock with its oval shape. For the kitchen, I'm looking for a clock with roman numerals, black colored print and french text.


from Amazon here.

A Sneak Peak

January 23, 2010


Here's a sneak peak. I don't want to give away too much, so I can wow you all with the finished room. We've put up the roman blinds, cleaned the floors and walls, put down the new rug and polished the furniture. I'm just waiting for the Scotch Guard on the rug to dry and then I can get the rest of the room back together. By the way, I'm so happy with our choice of rug. It's really thick, super soft and the color combo can go with anything.


Bloggy pal and fellow home DIYer Adrienne asked me about floors. These are the floors I have picked out. They are more red in person. The photo makes them look brown. It's commercial grade vinyl by Centiva. It's supposed to last like 500 years (not that you need it to last THAT long). It has a layer of acrylic on top which makes it super for a house with high traffic and pets. Plus they make just about any flavor! You can install them yourself the way you would hardwood floors, but it's a tad easier I heard. We'll see. Hubby wants to get this done sooner rather than later. I'm a bit stressed as is, but if he's willing to do it, then I'm game.

Ribba Frames

January 21, 2010

This weekend, we're making a trip to Ikea to pick out some new photo frames. Maybe now we can finally frame some of our wedding photos.

I really like these frames from Ikea. They come in all sizes which is great for framing large scale photos that you want to emphasize. I especially love the square ones which are often a difficult find.


Ribba frames from IKEA.

Cabinetry Crown Molding

Yay! The crown molding is finally up! We bought 2 pieces when it was on clearance ($60 yikes!) and it's been stowed away until now. We were so afraid to mess up the cuts so it took us a while before we had the guts to do it.


Molding over the hood. The wall still needs touching up where we sanded it again.

This picture is supposed to be of the toe kick under the cabinets (behind Basil). He thought I had a treat in my hand and kept sitting in front of me (and the camera). He's such a ham! The white dust on his chinny chin chin is from the sanding. Poor little guy.
Also, the hubs fixed up the phone jack and installed a new phone. We don't have a house phone, but eventually we might need it.
Next: .... Dare I say it? We're almost done with kitchen. We just need to get new countertops. They are on hold right now. We're searching for wholesalers and other specials. Our priority is getting the half bathroom installed, so we will have to turn on our energies on that next.

Clean Up and Loose ends

January 20, 2010

Cleaning up and loose ends are tasks that I always drag my feet on, but it must be done. Spackle residue lingered for weeks to months after we did our kitchen, so I wanted to be sure I got everything this time in after we were done with the dining room. I got on a ladder and wiped all the dust from the top of the window and door trim. I vacuumned over and over again because spackle or plaster would keep appearing. Then I got a mop to clean the walls off.


From ShopRite, this mop was extra wide which made cleaning up a lot faster because I was able to get a large area at once. The pad is disposable and washable, so after I cleaned the walls I used it to clean the floors. To clean linoleum floors, use water and a little bit of Ivory soap (from This Old House).


See the white residue left on the walls from the plaster that fell from the ceiling and sanding the spackle. That is everywhere!


Damp the mop just a bit and just wipe down the walls and all the trim.


For all of you who thought I was just be paranoid, look at all the dirt from the walls alone.


Tadaaaa! Clean and beoootiful.

Also, there was drips of paint or spackle on the floor which I scraped up with a spackle knife.(obviously, do not do this if you have hardwood floors!) Paint is water soluable so a wet rag should do it but for more stubborn drips, you can use a spackle knife.

Next: Changing out all the old outlets in the room. I have selected the new floors for the house but that will be a future project. Since all the tools are out, I'm thinking of finally putting up the faux paneling. That will take some planning since all our walls are different lengths.

Hanging the chandelier

January 18, 2010

Time: 5 Hours + then some

Hanging a chandelier requires a few things. It's a two person job. Preferably two strong, tall people. I would recommend hiring someone.


After we decided how low we wanted the chandelier to hang, we took it back down to shorten the chain and fix the wiring. The two lights closest to the north wall were turning on when the chandelier turned on, so something wasn't connected right.


The trash can came in handy to elevate the chandelier as we worked on the wiring.


This is a weight that goes on the bottom of the chandelier holding the arms together. It keeps the chandelier balanced and from swinging around.


Hold it and screw them in.


Using pliers, open up the chain, take some length of it out and reconnect it. You need a lot of strength for this. Then Keith shortened the wires, but not by too much in case we need it in the future. You can always reconnect the chain but not the wires. Then he bundled them up. The gold bracket is what gets screwed up into the bracket in the ceiling joists (not shown)


After a while, I just couldn't hold the chandelier anymore. Neither of us were tall enough. Our dining room ceiling is high and our ladder wasn't long enough. We had to get our friendly neighbor to help us. This took maybe 2 hours just because the wires kept getting caught in the chain and there was a lot of tweaking that needed to be done.

The following day, Keith spent another 3-4 hours fixing the wiring. It was only this complicated because we had two circuits on one switch but in two locations. There was something that just wasn't connected right so keith kept disconnecting and reconnecting a different combination of wires until the lights turned on individually from both switch locations.

Sore Arms

I know you're all anticipating some pictures of the chandelier (if you haven't already seen the one on face book). I'll type that post as soon as I can move my arms again.

More to come on that!

LinkedIn

Related Posts with Thumbnails